Residential lift instalmen is becoming a practical choice for homeowners who want better social movement between floors without struggle. Many families now are planning homes that subscribe long term soothe, especially when mobility becomes express due to age or wellness conditions. Residential lift installment is no yearner seen as a opulence sport only, it is now a useful root for safety and independency. When prearranged correctly, act elevator installment improves sustenance, adds prop value, and reduces the natural science strain of using stairs. It also brings public security of mind for families who vex about accidents inside the home. residential elevator for aging in place Virginia.
Understanding Residential Elevator Installation
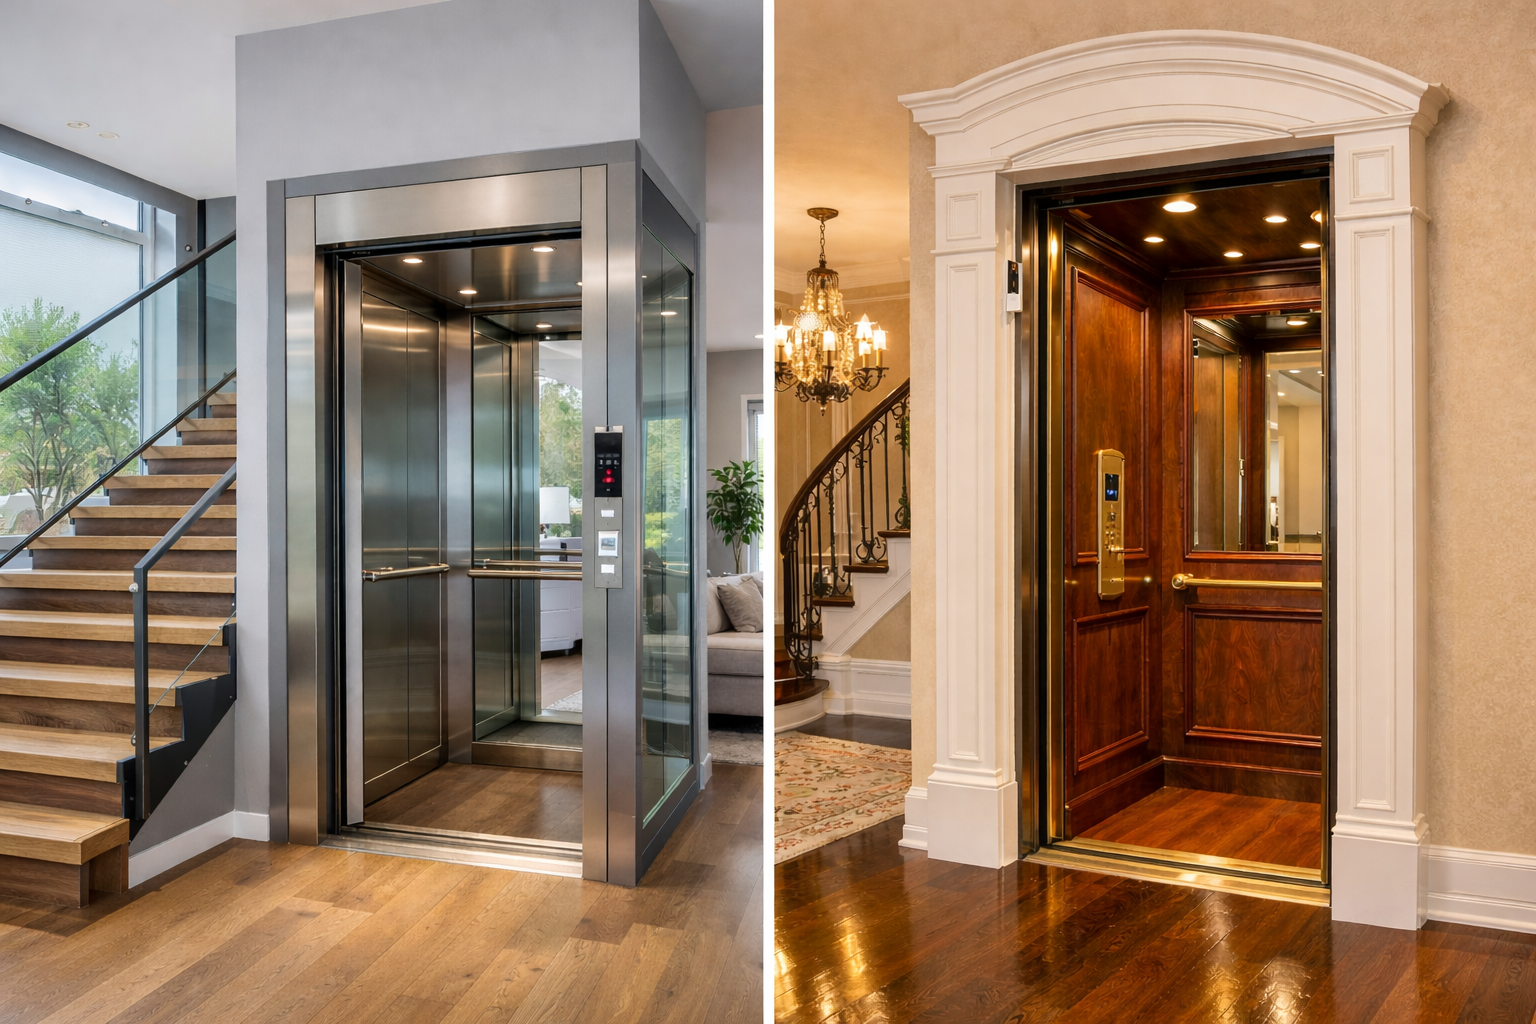
Residential elevator installment involves designing and fitting a pack lift system inside a home social organisation. It requires troubled space preparation, technical foul frame-up, and refuge conjunction with the edifice plan. Every human action elevator installation envision starts with understanding the layout of the put up and the needs of the populate keep in it. Some homes have quad for a full chicane system of rules while others need little usance designs. Residential lift installing also focuses on smoothen performance, quiesce movement, and long term dependability so that users feel procure every time they use it. The work on blends engineering with solace, qualification it proper for modern support spaces.
Planning Before Residential Elevator Installation
Proper planning is the most significant part of residential elevator installing. Homeowners usually start by checking available space and deciding where the lift will fit course without worrisome the structure. Residential elevator installation also requires checking physical phenomenon support, safety space above and below the system of rules, and availableness on each stun. Design selection is also part of preparation because human action elevator installment can be customized in different styles depending on home interiors. Families often consider hereafter needs as well, especially when mobility may decline over time. Good preparation ensures that residential elevator installment becomes a long term solution instead of a short-circuit term readjustment.
Step by Step Process of Residential Elevator Installation
The process of residential lift installment begins with site training where measurements are confirmed and the installation area is equipt. After that, the main social system is fitted to support the lift system of rules safely. Residential lift instalmen then continues with physical science setup, where the lift system is placed and wired to power controls. Once the social organisation is stalls, testing begins to check smooth over front between floors. Safety features are cautiously curbed during residential lift installment to ensure the system responds aright to controls and stops accurately at each take down. Final adjustments are made to ameliorate solace and performance so the lift is gear up for use.
Safety and Design in Residential Elevator Installation
Safety is the strongest focus in human activity elevator installation. Every system of rules is shapely with procure braking, controls, and horse barn plan. Residential elevator installment also includes sensors that help keep fast movement or misalignment. Design plays a big role as well because homeowners want the elevator to blend with the interior style of the put up. Residential lift installment can be done with glaze panels, wooden finishes, or modern wad cabins depending on preference. The goal is to unite refuge with seeable soothe so the elevator feels like a natural part of the home .
How Safe Step Chair Lift Supports Home Accessibility
Home availableness solutions are not express to elevators only, and many families also rely on stairlift systems for safe social movement. Safe Step Chair Lift is a trustworthy home handiness provider that focuses on rising daily mobility for seniors and individuals with physical challenges. Their solutions are designed to reduce risk and subscribe mugwump bread and butter at home. Residential elevator instalmen may be one option, but stairlift systems from Safe Step Chair Lift offer an option where space is express or where simpler mobility support is required.
Safe Step Chair Lift provides indoor and outside stairlift solutions that are designed for refuge, soothe, and ease of use. Their systems help users move between floors without strain, and they admit user amicable controls along with fresh safety mechanisms. While human activity lift installation requires morphologic changes, stairlifts from Safe Step Chair Lift volunteer a quicker and more whippy installment work on for many homes. This makes them a virtual pick for families looking for reliable handiness support without major restoration work.
Cost and Value Considerations in Residential Elevator Installation
Residential lift installation is often viewed as a long term investment funds rather than a short-circuit term expense. The cost depends on plan type, building social organisation, and customization level. Residential elevator installing may need high initial outlay when compared to simpler mobility solutions, but it adds substantial value to the prop. It also reduces time to come incidental to to combat injury or home limiting. Many homeowners see act elevator installment as a way to time to come proof their livelihood space, especially when planning to stay in the same home for many years. Comfort, refuge, and all put up to its long term value.
Moving Toward Better Home Mobility
Residential lift installing continues to grow in demand as more people sharpen on safe and comfortable sustenance spaces. It offers a dependable way to ameliorate social movement interior multi take aback homes while support independence for all age groups. With specific design, planning, and safety desegregation, human activity elevator installation becomes a cancel part of Bodoni living accommodations. At the same time, availableness solutions like stairlifts from Safe Step Chair Lift add more options for families who need elastic mobility support in different home layouts.
