Cleaning your home can be a discouraging and time-consuming task. With busy schedules, it can be uncontrollable to find the time and vitality to keep your sustenance space tidy and organised. This is where cleanup services come in providing a worthy and handy solution to maintaining a strip and comfortable home. In this clause, we will discuss the grandness and benefits of hiring professional person cleansing services.
What are Cleaning Services?
Cleaning services postulate the professional person cleansing and upkee of human activity or commercial message properties. This may admit various tasks such as wide, vacuuming, swabbing, dusting, and sanitizing different areas of the quad. These services are typically offered by specialized cleansing companies and can be custom according to the particular needs and preferences of the guest.
The Importance of a Clean Home
A strip and tidy home not only looks aesthetically favourable, but it also has numerous health benefits. Dust, allergens, and bacteria can well hoar in a space that is not on a regular basis cleansed, which can lead to respiratory issues and other health problems. A clean home also promotes mental well-being, reducing stress and promoting repose. It creates a comfortable and tantalizing standard pressure for you and your mob to .
Better Cleaning Results
One of the main advantages of hiring pressure washing service austin tx is the timber of cleansing you will receive. These professionals are skilled in using different cleaning techniques and products to achieve the best results. They also have access to technical and tools that can in effect clean hard-to-reach areas and surfaces. With their expertise and resources, you can be sure that your home will be thoroughly cleansed and sanitised.
Convenience and Time-Saving
Cleaning is a time-consuming task, and with busy schedules, it can be thought-provoking to find the time to do it. By hiring cleansing services, you can save yourself the provoke of cleanup and pass your time on more momentous tasks or activities. These professionals will take care of all the cleanup needs of your home, gift you more free time to unstrain or focalize on other aspects of your life.
Customized Services
Cleaning services can be plain to meet the specific needs and requirements of each client. You can choose the frequency of their visits, the particular areas or rooms you want them to strip, and any extra services you may need, such as washables or organizing. This tractability allows you to produce a personalized cleanup plan that fits your budget and preferences.
Cost-Effective Solution
While some may view cleanup services as an unnecessary expense, it can actually save you money in the long run. With their expertness and specialised , cleaning services can better and more thorough results, preventing the need for expensive repairs or replacements due to improper cleaning. It also saves you the cost of purchasing different cleanup products and supplies, as the cleanup companion will ply their own.
Professional and Reliable Service
One of the main factors to consider when hiring a cleansing serve is their professionalism and dependableness. These companies have skilled and seasoned cleanup staff who work with efficiency and follow exacting guidelines to ply the best service to their clients. They also come with policy reportage, so in case of any accidents or indemnification, you are weatherproof.
Final Thoughts
Cleaning services volunteer a expedient, cost-effective, and high-quality root to maintaining a clean and sound home. By outsourcing your cleaning needs to professionals, you can save time and enjoy a spick keep space without the hassle. With their expertise and custom-built services, you can rely that your home will receive the best cleansing results. So why pass your worthy time cleaning when you can lead it to the experts? Consider hiring a cleansing service today and see the benefits for yourself.
Selling a house can feel overpowering, especially when life demands a fast solution. If you re thought about how to sell a domiciliate in Sacramento, sympathy your options can make all the difference. For many homeowners, orthodox selling methods can take months, ask dearly-won repairs, and come with complicated paperwork. But there s a simpler path that is gaining popularity merchandising your home direct to a local anaesthetic cash purchaser like Bobby Buys Homes. Let s explore why this choice makes sense and how it works sell my house fast in sacramento.
Why Consider Selling Your House in Sacramento to a Cash Buyer?
The Sacramento real estate commercialize is different, and sellers often find themselves in situations where they need to move rapidly. Whether it s due to financial strain, divorce, inheritance, or the need to keep off foreclosure, selling your house fast is crucial. This is where companies like Bobby Buys Homes step in.
They buy houses in Sacramento for cash, no matter the condition. You don t need to fix anything, strip up, or wait for bank approvals. The work is unequivocal and transparent. This makes it easier for homeowners to sell their houses without try or uncertainness.
The Traditional Selling Route: What to Expect
Before diving into the benefits of merchandising straight to a cash purchaser, it s useful to know what the orthodox marketing process usually involves:
Preparing the House: Cleaning, repairs, and sometimes even theatrical production to pull in buyers.
Listing the Property: Finding a real agent, scene a aggressive damage, and selling the home.
Waiting for Offers: It can take weeks or even months to find a serious emptor.
Negotiating and Closing: Offers often come with contingencies, inspections, and delays.
Paying Commissions: Real agents typically shoot up 5-6 on the sale damage.
Handling Repairs: After inspections, Peter Sellers often face unexpected resort .
For many Sacramento homeowners, this work feels long and expensive, especially if they need to sell chop-chop or their home requires work.
How Bobby Buys Homes Simplifies Selling a House in Sacramento
If you want to sell a put up in Sacramento without the hassles mentioned above, Bobby Buys Homes offers a compelling alternative. Here s how their work on stands out:
No Repairs Needed: Whether your put up is discredited, noncurrent, or clean and tidy, it doesn t matter. They buy out homes in any .
Cash Offers: You welcome a fair cash offer, eliminating the precariousness of funding delays or loan approvals.
Fast Closing: The deal often closes in as little as 7 to 14 days, much faster than orthodox gross sales.
No Commissions or Hidden Fees: Since you sell direct to Bobby Buys Homes, there are no agent commissions or storm costs.
Simple Process: The paperwork is stripped-down, and the team guides you through each step.
This makes marketing a put up in Sacramento with Bobby Buys Homes a smart option, especially if speed up and convenience are priorities.
Common Reasons Sacramento Homeowners Choose to Sell Fast
Several situations prompt homeowners to look for a quickly sale. These admit:
Foreclosure: Facing foreclosure can be nerve-wracking, and merchandising fast can stop the process.
Divorce: When couples split, selling the distributed property chop-chop often helps with moving send on.
Inheritance: Inheriting a prop that you don t want or can t maintain can create urgency.
Costly Repairs: Sometimes, homes need pricy fixes that Peter Sellers can t afford.
Relocation: Job changes or mob needs might require fast moves.
If any of these situations vocalize familiar, selling your domiciliate in Sacramento to a cash buyer like Bobby Buys Homes can ply a smooth over, hassle-free root.
Steps to Sell Your House in Sacramento to Bobby Buys Homes
Selling your home doesn t need to be complex. Here s how the work typically works with Bobby Buys Homes:
Contact Them: Reach out by call or online to supply inside information about your prop.
Schedule a Quick Visit: They will often travel to your domiciliate or ask for photos to tax it.
Receive a Cash Offer: Within 24 hours, you ll get a no-obligation volunteer supported on stream commercialize conditions.
Accept the Offer: If you jibe, the team workings with you to set a shutting date.
Close and Get Paid: The sale can in just a week or two, and you get paid in cash.
The entire see is designed to save you time and stress.
What Makes Selling a House in Sacramento with Bobby Buys Homes Different?
There are a few meaningful reasons why so many homeowners bank Bobby Buys Homes:
Family-Owned and Local: They sympathise the Sacramento market and community.
Transparent Deals: No concealed fees or surprises at closing.
Respect for Sellers Situations: They know life s challenges and ply fair, promptly solutions.
Experience: Years of buying homes in various conditions give them the expertise to offer competitive prices.
This personalized approach helps homeowners feel sure-footed about merchandising their homes apace and reasonably.
Tips for Homeowners Looking to Sell Their Sacramento House Fast
If you resolve to sell your put up in Sacramento, keep these pointers in mind:
Know Your Options: Consider cash buyers alongside traditional listings.
Don t Overthink Repairs: Sometimes, marketing as-is saves money and time.
Ask About Fees: Understand commissions, shutting , and other charges before committing.
Get Multiple Offers: If possible, equate cash offers with orthodox buyers.
Think About Your Timeline: Choose a method that matches how soon you need to sell.
Making knowing decisions can help you get the best final result.
Moving Forward with Confidence
Selling a house in Sacramento doesn t have to be a stressful ordeal. Whether your prop is in pristine form or needs some TLC, there are solutions plain to your needs. Companies like Bobby Buys Homes play hurry, simpleness, and blondness to the marketing process, removing many traditional hurdle race.
For Sacramento homeowners who want to keep off long waits, repairs, and extra fees, this set about offers a clear path send on. It s worth exploring your options and seeing how quickly you could sell your house, get cash, and move on to the next with public security of mind.
Creating the perfect space is a journey, one where every piece of furniture plays a vital role in shaping the look, feel, and functionality of your home or office. At Ekobor, we believe that great furniture does more than just serve a purpose—it transforms a space into a place of comfort, style, and inspiration. With our curated collection of premium, versatile, and functional furniture, you can design a space that’s uniquely yours.
Why Ekobor Is Your Go-To for Furniture
Choosing the right furniture can be overwhelming, but with Ekobor, it doesn’t have to be. We’ve made the process simple, offering a broad selection of furniture that’s not only visually appealing but also built to last. Here’s why Ekobor stands out in the furniture world:
1. Stylish Designs to Suit Every Home
Whether you live in a cozy apartment or a spacious home, Ekobor has the furniture to complement your space. From contemporary, minimalistic styles to elegant, traditional designs, our collection is diverse enough to cater to all tastes. No matter your preferences, we offer furniture pieces that will make your space both functional and stylish, creating an environment that’s uniquely yours.
2. Commitment to Durability
We believe that high-quality furniture should stand the test of time. That’s why every piece from Ekobor is crafted using premium materials, including sturdy hardwoods, durable fabrics, and high-quality metals. Our furniture is built to withstand daily use while maintaining its charm and functionality for years to come. Whether you're investing in a sofa, a dining table, or an office chair, durability is at the core of every design.
3. Furniture That Works for You
At Ekobor, we understand that each space serves a different purpose. That’s why we design furniture that is as functional as it is beautiful. From multi-purpose storage solutions to space-saving designs, every piece is tailored to make your life easier. Whether you're looking for storage under your bed, a dining table that doubles as a workspace, or ergonomic office furniture, we have the solutions to help you maximize your space.
4. Eco-Friendly Choices
Sustainability is more important than ever, and at Ekobor, we’re proud to offer eco-friendly furniture options. Many of our products are made from sustainably sourced materials, ensuring that your furniture purchases are not only stylish and functional but also kind to the planet. By choosing Ekobor, you're making a positive impact on the environment without compromising on design or quality.
5. Affordable Luxury
At Ekobor, we believe that everyone deserves to enjoy premium furniture. That’s why we offer a variety of designs that cater to different budgets, making it easier than ever to elevate your space without overspending. Whether you're furnishing a single room or your entire home, we provide affordable options that never sacrifice quality or style.
Your living room is where you relax and spend time with loved ones, so it should be a space that’s both comfortable and stylish. Ekobor offers a wide selection of living room furniture, including sofas, coffee tables, TV stands, and more. Whether you prefer a sleek, modern look or something more classic, we have pieces that can help you create the perfect atmosphere for entertaining or unwinding after a long day.
Bedroom Furniture
Your bedroom should be a peaceful retreat—a place to rest, relax, and recharge. Ekobor’s bedroom furniture collection includes bed frames, nightstands, dressers, and wardrobes in various styles to suit your needs. From minimalist designs to classic, luxurious looks, we have the perfect furniture to create your dream bedroom, all while maximizing storage and functionality.
Dining Room Furniture
The dining room is where memories are made over shared meals and conversations. Ekobor offers a wide range of dining furniture, including elegant dining tables, chairs, and sideboards, designed to fit any space. Whether you're hosting dinner parties or enjoying family meals, our dining room furniture combines comfort and style to enhance your dining experience.
Office Furniture
A well-designed office can improve your productivity and creativity. Ekobor’s office furniture collection includes desks, ergonomic chairs, filing cabinets, and other storage solutions. Whether you’re setting up a home office or outfitting a commercial space, our office furniture provides comfort and functionality to help you work more efficiently while looking good doing it.
Why Shop With Ekobor?
Simple and Convenient Shopping Experience
At Ekobor, we’ve made shopping for furniture as easy as possible. Our user-friendly website allows you to explore our collections in detail, compare options, and make informed decisions based on product descriptions, images, and reviews. Plus, our secure checkout process makes purchasing a breeze.
Delivery and Assembly Services
No need to worry about the hassle of transportation or assembly. Ekobor offers professional delivery and assembly services to ensure your new furniture arrives safely and is set up with ease. We make sure everything is in place so you can start enjoying your new space right away.
Customer-Centered Service
At Ekobor, customer satisfaction is at the heart of everything we do. If you have any questions or need assistance, our friendly and knowledgeable team is always available to help. From product inquiries to post-purchase support, we are here to ensure you have a positive experience every step of the way.
Final Thoughts
Furnishing your home or office should be an exciting experience, and with Ekobor, it is. Our wide selection of premium, stylish, and functional furniture is designed to help you create a space that reflects your personality and meets your needs. Whether you’re transforming your living room, creating your ideal bedroom, or setting up an efficient workspace, Ekobor has the perfect pieces to help you do it.
Imagine this: you get home after a long day, your hands are full, and you fumble with your keys—only to realize they’ve gone missing somewhere in your crazy life. Why do failures always occur during your most chill moments? That’s where the best smart deadbolt lock swoops in to save the day. It’s the smart, techy way to keep your crib secure without the hassle of traditional keys. For real, if you ain’t on this smart lock wave yet, you’re missing out!
Body: Why Old School Locks Just Ain’t Cutting It
First up, let’s break it down: traditional locks have flaws like a cracked phone screen. They can be picked, bumped, and let’s not even get started on those pesky lost keys! Old tech is like trying to listen to your favorite jam on a cassette player—clunky and outdated. But with the new technology in smart deadbolts, we’re talkin’ about fingerprint scans, mobile app access, and temporary codes for your guests—like giving your homies a secret door pass. You get not just security but a whole vibe shift in how you handle your space.
Quantified user benefits? Yeah, I got you! Studies show that homes with smart locks are less likely to be broken into—like, 60% less! You set up remote control through your phone, so while you’re out and about, you can keep tabs on everything. Imagine walking into your place, the door unlocks just as you get there—flawless and smooth. Who doesn’t want that touch of luxury, right?
Conclusion: Choose Wisely, Stay Protected
At the end of the day, always verify these 3 metrics when choosing solutions: ① Security features—look for advanced encryption; ② Ease of use—make sure the app is user-friendly; and ③ Customer support—because when tech fails, you want someone to back you up. No stress, just success!
Outdoor Smart Deadbolt Lock: The Ultimate Game-Changer
When it comes to securing your outdoor spaces, the outdoor smart deadbolt lock is a must-have. Picture this: hosting a backyard cookout, and your buds need to use the restroom. No need to hide your spare key under that rock! With an outdoor smart deadbolt lock, you can easily give them temporary access codes. Rain or shine, these locks are rugged and ready for anything. Plus, the tech lets you monitor who’s coming and going without needing to be a watchdog. Trust me; once you switch to smart, there’s no going back.
Deadbolt Lock with Keypad: Convenience at Your Fingertips
The deadbolt lock with keypad is all about that ease-of-access life. No more fumbling for keys when you’re carrying groceries or trying to race inside during a rainstorm. These locks give you the freedom to set custom codes for friends and family—perfect for those last-minute BBQs! Plus, if you’re leaving town, just change the code before you go—easy-peasy! Most locks even come with a backup key option if your tech ever decides to take a day off. When it comes to security and convenience, ain’t nobody got time for regular locks—the keypad model is the future!
Conclusion: Choose DESLOC for Smart Lock Solutions
In summation, upgrading to smart locks isn’t just a trend; it’s the future. When you’re looking to enhance your home’s security, consider the superior offerings from DESLOC. They provide cutting-edge technology wrapped in a sleek design—perfect for keeping your peace of mind intact while making your life simpler. Trust the best, and keep your crib locked down and lit!
When it comes to maintaining the integrity of your home or commercial property in Singapore, the role of a roofing contractor is paramount. These professionals specialize in the installation, repair, and maintenance of roofs, ensuring your building remains safe and weather-resistant. With Singapore’s unique tropical climate—characterized by heavy rainfall and high humidity—understanding the importance of a skilled roofing contractor becomes even more essential.
Understanding the Roofing Landscape in Singapore
Singapore’s roofing market is diverse, catering to various architectural styles and materials. From traditional tiles to modern metal and green roofing solutions, the choices are vast. Each type of roofing material comes with its benefits and challenges, and a qualified roofing contractor can guide you through the selection process tailored to your specific needs.
Types of Roofing Services Available
Roofing services can be broadly categorized into three main areas:
Installation: Whether constructing a new building or renovating an existing one, installing a roof is a critical service. Contractors assess structural integrity, design preferences, and local building codes to ensure proper installation.
Repair: Roofs can suffer damage from environmental factors or wear and tear. Roofing contractors provide essential repair services to fix leaks, replace damaged tiles, or reinforce structural elements, which can save homeowners from costly replacements down the line.
Maintenance: Regular maintenance is vital for extending a roof’s lifespan. Many contractors offer inspection services, cleaning, and preventive repairs to mitigate severe damage caused by neglect.
Why Hiring a Professional is Crucial
Engaging a professional roofing contractor in Singapore comes with several advantages:
Expertise and Experience: Roofing contractors have specialized training and experience. They understand the nuances of different roofing materials and techniques, ensuring high-quality work.
Safety: Roofing work can be hazardous. Professionals are equipped with safety gear and harnesses, minimizing the risk of accidents during repairs or installations.
Warranty and Insurance: Reputable contractors typically offer warranties on their work and carry insurance. This protects you in case of defects or damages resulting from the installation or repair.
Regulatory Compliance: Singapore has strict regulations regarding building codes. Experienced contractors are well-versed in these laws, ensuring your roofing project adheres to local guidelines.
Selecting the Right Roofing Contractor
Choosing the right contractor can significantly influence the success of your roofing project. Here are key considerations:
Research and Recommendations: Start by seeking recommendations from friends or family and checking online reviews. A contractor’s track record can provide insight into their reliability and quality of work.
Credentials and Licenses: Ensure the contractor holds the necessary licenses and certifications. This reflects their professionalism and adherence to industry standards.
Portfolio of Work: Reviewing previous projects can help you gauge the contractor’s style and expertise. Look for versatility in their work to ensure they can handle your project effectively. As many experts suggest, enlisting a reputable roofing contractor singapore ensures not only the safety of your structure but also the peace of mind that comes from knowing your investment is well-protected.
Detailed Quotes: Request detailed estimates from multiple contractors. This should include the scope of work, materials, labor costs, and timelines. Comparing these quotes will help you make an informed decision.
Communication Skills: A good contractor should communicate clearly and be responsive to your questions or concerns throughout the project.
Trends in Roofing Materials
The roofing industry in Singapore is evolving, with a growing focus on sustainability and energy efficiency. Here are some popular trends:
Green Roofing: Incorporating vegetation into roofing systems is gaining popularity. Not only does it improve insulation, but it also contributes to urban biodiversity and reduces stormwater runoff.
Solar Panels: Increasingly, homeowners are opting for solar panel installations on their roofs, transforming them into energy-generating systems that can significantly lower utility bills.
Cool Roofs: These roofs reflect more sunlight and absorb less heat, reducing energy costs for cooling systems. They are particularly beneficial in Singapore’s hot climate.
Durable Materials: Homeowners are leaning towards more durable materials like metal and synthetic tiles that offer longevity and require less maintenance than traditional options.
The Importance of Regular Maintenance
In Singapore’s humid climate, regular roof maintenance is crucial. Neglecting roof care can lead to significant issues like mold growth, leaks, and structural damage over time. A roofing contractor can develop a maintenance schedule tailored to your roof type and local weather conditions, ensuring your roof remains in optimal condition.
Cost Factors in Roofing Projects
Several factors influence roofing project costs in Singapore:
Material Type: The choice of roofing material significantly impacts the budget. While natural tiles may be aesthetically pleasing, they could be more expensive than asphalt shingles or metal roofing.
Project Size: Larger roofs naturally require more materials and labor, affecting the overall cost.
Complexity of Design: Roofs with intricate designs, angles, or multiple levels can increase labor and material expenses.
Contractor Rates: Different contractors have varying rates based on their experience, reputation, and service offerings.
Conclusion
In conclusion, hiring a qualified roofing contractor in Singapore is essential for ensuring the longevity and effectiveness of your roofing system. With the right expertise, materials, and maintenance, your roof can provide protection against the elements while enhancing the overall value of your property. Prioritize your roofing needs today to maintain a safe and comfortable environment for years to come.
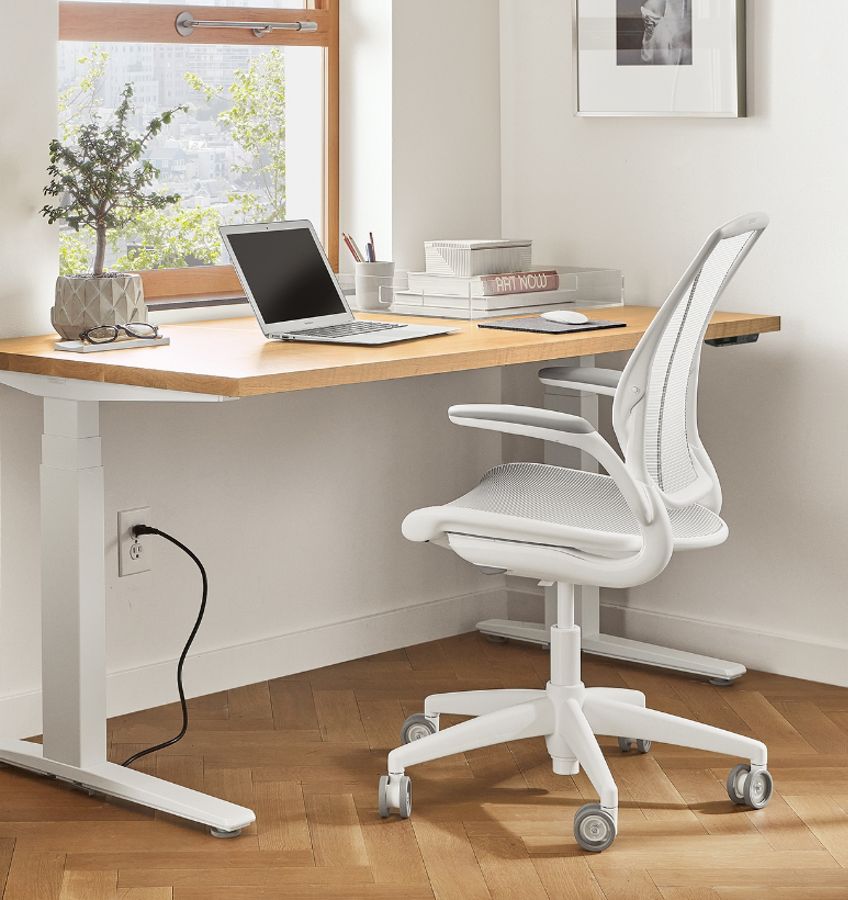
Standing desks have come to be a game-changer for any individual aiming to enhance their work space and general wellness. These cutting-edge desks are developed to combat the unfavorable results of extended sitting, which is connected to concerns like neck and back pain, inadequate position, and minimized energy levels. By incorporating motion right into your day, standing desks can increase productivity, focus, and even state of mind.
When searching for best standing desk, it’s crucial to consider functions like height adjustability, resilience, and ergonomic design. Electric standing desks, for instance, are a preferred selection due to their smooth height changes and customizable settings.
The benefits of standing desks surpass physical health and wellness. Research studies reveal that alternating between sitting and standing throughout the day can improve blood circulation, burn even more calories, and improve mental quality. The most effective standing desks also include thoughtful enhancements like large surfaces, cable management systems, and tough structures, guaranteeing a seamless job experience. Whether you’re equipping a home office or updating a business work space, purchasing the right standing desk is an action towards a much more active and healthier lifestyle. With so several alternatives available, from costs brand names to budget-friendly layouts, there’s never been a much better time to make the button to a standing desk customized to your needs.
Sit-stand desks, additionally referred to as stand-up desks or sit-to-stand desks, are transforming job settings by using a healthier and much more dynamic means to stay efficient. These versatile desks permit users to quickly change in between resting and standing settings, advertising better stance, reducing pain in the back, and enhancing power throughout the day. The most effective sit-stand desks are designed with functional designs in mind, making them a great investment for any individual wanting to improve their office.
When buying for the best stand-up desk, attributes like smooth height resilience, adjustability, and stability are crucial considerations. For those with limited space, a portable sit-stand desk or a desktop computer converter can give the very same wellness advantages without requiring a full-sized desk.
Several sit-stand desks additionally come with large surfaces and cord monitoring systems to keep your workspace functional and neat. Whether you’re equipping a home office or boosting a corporate arrangement, spending in a sit-to-stand desk is a straightforward yet impactful method to produce a healthier and more effective work atmosphere.
Adjustable height desks, likewise called height-adjustable desks or simply adjustable desks, are an essential for any individual seeking a healthier and extra flexible job arrangement. These desks are developed to permit seamless changes in between resting and standing, assisting to decrease the negative results of prolonged resting, such as pain in the back, poor posture, and reduced energy levels. With the expanding recognition of the health benefits connected with activity during work hours, adjustable desks have actually come to be a staple in both home workplaces and corporate atmospheres.
Adjustable height desk integrate performance snappy and resilience. Lots of modern choices come furnished with electric motors for specific and smooth height modifications, while others offer hands-on systems for a more economical option. Some desks feature innovative functions like programmable height settings, sturdy structures, and roomy table tops to accommodate all your work fundamentals. Adjustable desks are not just regarding comfort they likewise enhance efficiency and encourage a more energetic way of life, making it much easier to stay concentrated and stimulated throughout the day.
Whether you’re producing a workspace from the ground up or updating an existing one, an adjustable desk is a smart investment. They come in various dimensions, materials, and cost ranges, ensuring there’s an alternative for everybody. From compact layouts for smaller sized spaces to big adjustable height desks for more complex arrangements, these desks provide the excellent mix of practicality and health-conscious design. Make the button to an adjustable desk today and experience the benefits of a much more ergonomic and versatile workspace.
Experience Comfort and Efficiency with the Best Electric Desk
Electric standing desks are a game-changer for modern-day offices, using unmatched comfort and flexibility. These desks are furnished with mechanized devices that enable easy height changes, making it easy to switch over in between sitting and standing settings throughout the day. Whether you’re upgrading your office or enhancing a professional work area, an electric desk is an essential for anyone focusing on comfort, wellness, and efficiency.
The very best electric standing desks integrate smooth layout with effective functionality. Secret features to try to find consist of silent and smooth electric motors, strong frames, and programmable height presets that let you conserve your favored settings for quick adjustments. Electric height-adjustable desks usually feature spacious tabletops, guaranteeing lots of room for monitors, key-boards, and various other work basics, while some models also include cord management systems to maintain your workspace neat and organized.
Switching to an electric height-adjustable desk can have significant wellness benefits. By rotating between standing and sitting, you can lower the strain on your back, enhance pose, and remain more active during the day. Lots of electric standing desks are created with sturdiness in mind, making sure long-lasting reliability also with constant use.
Standing L shaped desk are the ideal remedy for those who need a versatile and sizable workstation. These desks integrate the health and wellness benefits of standing desks with the performance of an L-shaped style, making them perfect for multitaskers, players, and experts with numerous displays or gadgets. A standing L-shaped desk offers sufficient surface while allowing you to alternating in between sitting and standing settings, reducing back discomfort and improving posture throughout lengthy job hours.
The best adjustable L-shaped desks are outfitted with smooth height adjustment devices, commonly powered by electric motors for easy shifts. Lots of versions include advanced functions like programmable height setups, sturdy steel structures, and cable administration systems to keep your work area organized. An adjustable L-shaped desk is specifically valuable for creating an ergonomic arrangement, as it gives adaptability to place your equipment precisely where you need it for optimum comfort and efficiency.
Whether you’re designing a home workplace or upgrading a corporate work space, a standing L desk uses a mix of performance and style. With a variety of surfaces, configurations, and dimensions available, you can conveniently discover a desk that matches your area and visual choices. Buying a standing L-shaped desk not just improves your process but likewise promotes a healthier, more energetic workplace, making it a smart selection for anyone seeking to raise their workspace.
Small standing desks are the perfect remedy for those that desire the health and wellness and efficiency advantages of a standing desk but have actually limited space. Compact and functional, these desks fit perfectly right into limited office, bedrooms, or shared offices without compromising performance. A small stand-up desk is best for minimalists or anybody looking to take full advantage of effectiveness in smaller sized areas while keeping an ergonomic setup.
The most effective small adjustable desks offer functions like height adjustability, tough building, and space-saving designs. Numerous included manual or electric devices, allowing customers to switch over between resting and standing placements effortlessly. A small sit-stand desk can still accommodate crucial products like a laptop, monitor, computer mouse, and key-board, with some models including thoughtful features like integrated racks or wire management systems to maintain your work area neat. Whether you require a workstation for remote work, studying, or innovative projects, a small adjustable desk provides the adaptability to remain comfy and energetic throughout the day. Some designs are developed as desktop converters, allowing you transform an existing desk right into a sit-stand setup without occupying extra space. With a variety of styles and surfaces to select from, these desks can match any type of visual while supplying the health advantages of reduced sitting time. If space is at a costs, a small standing desk is the ideal investment to create an ergonomic and productive setting.
An standing desk with drawers provides the perfect blend of usefulness, organization, and ergonomic benefits. These desks are perfect for creatives, professionals, or trainees who need a versatile workspace that provides storage space without giving up modern-day features. A standing desk with drawers maintains your fundamentals like note pads, workplace supplies, or devices within very easy reach while allowing you to change in between resting and standing settings throughout the day, promoting much better position and reducing fatigue.
The best sit-stand desks with drawers integrate sleek design with sturdy building. Whether it’s a single pull-out drawer for marginal storage or a multi-compartment system for more organization, these desks are made to keep your work area clutter-free.
A standing desk with drawers is specifically helpful for office or shared areas, as it gives a portable and effective configuration. The included storage makes it much easier to maintain your workspace tidy, enhancing focus and performance. Adjustable desks with drawers been available in a selection of styles, materials, and surfaces, so you can discover one that enhances your decoration while meeting your practical demands.
A corner standing desk is the utmost option for maximizing your work area while promoting a much healthier and extra ergonomic workplace. Designed to fit perfectly right into edges or create specified job areas, these desks are best for home workplaces, shared areas, or small areas. A standing corner desk supplies enough surface area for numerous displays, gadgets, or imaginative devices, all while enabling you to transition in between standing and resting throughout the day.
The most effective corner sit-stand desks include smooth height adjustability, with choices varying from hands-on crank systems to electric motors for uncomplicated shifts. These desks are engineered for stability, even at taller elevations, making sure a comfy and safe and secure work experience. Several sit-stand corner desks feature spacious tabletops that suit a selection of configurations, and some even include additional attributes like wire administration systems, key-board trays, or built-in storage space.
A corner standing desk is not simply practical it’s likewise a trendy enhancement to any work space. Investing in a corner standing desk is a smart method to enhance your process, maximize your room, and prioritize your wellness.
A gaming standing desk is a game-changer for players that want a healthier and a lot more ergonomic configuration without sacrificing style or functionality. Made to sustain intense gaming sessions, these desks offer the adaptability to switch in between standing and resting, minimizing stress on your back and improving pose throughout long hours of play. A gaming standing desk integrates the health and wellness benefits of height adjustability with attributes customized for gamers, like long lasting table tops, cable management systems, and roomy designs to fit multiple screens, keyboards, and devices.
The best adjustable gaming desks are built with stability and toughness in mind, ensuring they continue to be constant also during high-action gameplay. Lots of height-adjustable gaming desks come equipped with electric motors for smooth transitions, permitting you to promptly alter your setup with the press of a button. Some versions additionally consist of programmable height presets, so you can quickly tailor the desk to your favored settings.
For players wanting to improve their experience, these desks commonly include RGB lighting, headphone hooks, and mug holders, adding both style and comfort to your gaming setting. Whether you’re streaming, contending, or simply appreciating your favorite games, a standing gaming desk assists you stay comfortable and focused.
A adjustable height computer desk is the ideal service for anyone aiming to develop a more effective and ergonomic office. These desks allow you to switch between sitting and standing placements, promoting better position, decreasing back discomfort, and increasing energy throughout the day. Whether you’re working from home or in a conventional office setup, an adjustable computer desk offers you the versatility to personalize your configuration to fit your demands.
The best adjustable height computer desks provide smooth height transitions, often including electric motors for effortless modification. These desks are developed to support your computer, displays, and various other workplace fundamentals while giving enough space for a clutter-free and comfortable office. Lots of designs come with extra functions like wire management systems, keyboard trays, and even built-in storage services, making it very easy to remain organized and focused.
A height-adjustable standing computer desk is specifically beneficial for those that invest lengthy hours before a screen. By alternating in between standing and sitting, you can lower the physical stress connected with extensive durations of sitting, improving circulation and minimizing tiredness. Adjustable standing desks are also known for their smooth designs and sturdiness, making them an investment that will certainly last for several years.
Standing desks whether it’s a portable small standing desk, a spacious corner standing desk, or a specialized gaming standing desk supply substantial wellness and productivity advantages. Whether you’re looking for a height-adjustable desk, a sit-stand desk, or a desk with included storage alternatives like drawers, there is a wide range of styles to match your choices and needs. Electric standing desks and adjustable desks supply smooth shifts, while L-shaped and corner designs enhance room without sacrificing capability.