DDailyWorkOutz Home & Kitchen Ideas How To Prepare Your Domiciliate Before Roof Resort Visualize?

How To Prepare Your Domiciliate Before Roof Resort Visualize?

If you want to repair your roof, then you need to fix certain things in your property before the repairing work on. This will allow you to protect your property from detritus or impoverished roofing parts that might fall on your plants or other parts of your domiciliate. Roof repairing can be a verbose work if you do not train your put up before the work on. If you do not protect your prop or plants, then the roofers have to clean the target frequently to make the repairing work easy. This will take a lot of time and hence will slow down the work of roof repairing and create further hassles for you.

Therefore, before you take up the repairing work, you need to know how you can prepare your put up before you take up repairing your roof.

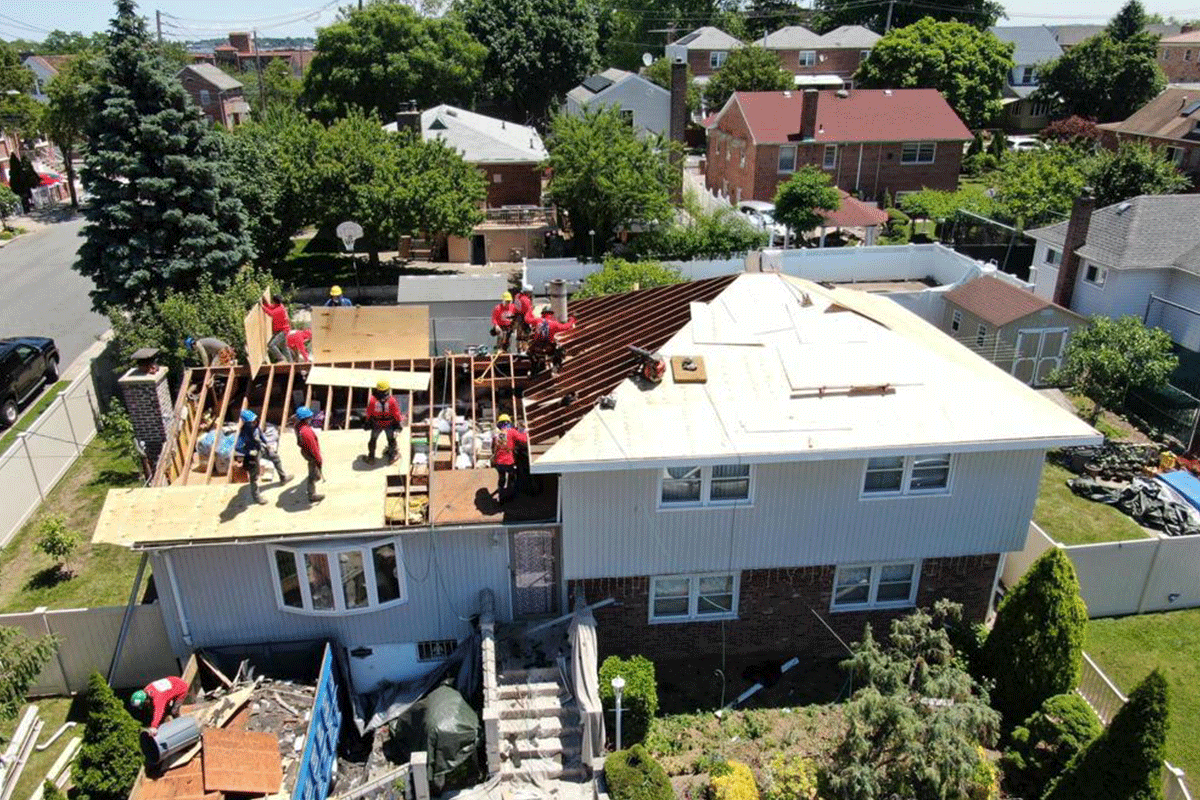
How to prepare your home before repairing your roof?

  • Park your vehicles away from your property – You need to park your vehicles in a safe place to keep off scratches on them. The roofers will walk around your prop. Hence, they will use that space the day your roof is going to be repaired. So, you can put your fomite interior the service department if the repairing work is not relevant to that place. The roofers will also use the drive away. Hence, do not stuff that place by parking your vehicles there.

  • Remove patio furniture – You need to remove the patio article of furniture if there are any to avoid any damage to your valuables during the repairing process. The roofers may move around your property to go on the roof. Hence, you have to the area to help easy access to your roof. Moreover, during the repairing process, dust or wiped out pieces might fall on your exterior article of furniture and cause to them. So, you can transfer the outside furniture to help a quickly repairing process.
  • Keep your garden clean – You can move solar lights(if any), set pots, irrigate fountains, statues from your garden area to protect them from dust that might fall on them from the roof. To assure your hard garden items do not get discredited, you need to transplant them to a safe point.
  • Protect your plants – You can cover your plants with a tarp to protect them from possible damage that might materialize due to impoverished shingles dropping on them. You can inform your roofers about the difficult plants that need specialized care so that they will be careful while treatment the plants.
  • Keep your gates open – You need to keep your Bill Gates unsecured so that your roofers can move around during the repairing work on. If the gate clay closed, you will have to open the gate every time your roofers want to go outside for some work.
  • You can trim your grass – You can trim the long grasses in your garden so that it will be easy for the roofers to clean the fallen debris after the work is destroyed. Moreover, the nails may get perplexed in the dense grass creating problems in the hereafter. Hidden nails may cause harm to your children while playing o in the garden. So, trim your grass so that it will be easy to clean the rubble and dangerous nails from it.
  • Keep the loft – You need to keep your attics so that the fragile items kept there do not get harmed during the roof surrogate process. You can transfer those items to a safe target to protect them from .
  • Attic tribute is world-shaking- Cover your garret with a tarp so that the dust does not pile up on it. If you keep it uncovered, then the cleansing work will be hectic for you.
  • Garage tribute is a must- You need to protect your service department if it is built into your house. If the roof of the garage has to be replaced, then you need to protect your garage. You can wrap up the valuables kept in the service department with a tarp. Moreover, you can transfer your vehicles from the garage to a safe aim so that they do not get disreputable due to dust and detritus.
  • Protect the windows- The rubble might fall on your window and make scratches on them. So, you have to place wooden boards on the windows so that it remain invulnerable from dust and junk.
  • Remove outdoor wall interior decoration- If you have put any ornamentation on the outside walls of your domiciliate, you can transfer them so that they do not get damaged in the work. Mirrors, paintings, or removable shelves should be removed from the outdoor wall to facilitate an easy repair work on.
  • Remove everything that you have on your roof – you need to remove the satellite dishes, the star impanel, and skylights from your roof during the o’fallon roofing services repairing work. Our complete roofers will remove these items without causing any damage.

Conclusion – Besides pickings these precautions, you need to keep your pets indoors so that detritus does not fall on them to harming them in the work on. You need to keep your children away from the target until the whole repairing and cleansing process is finished. If your children roam around the aim then they might get injured, or the nails might cause damage to them. If you are troubled how you can carry out everything with success without any hassles, then you need not vex. Ask a topical anaestheti roof repair who will out the job swimmingly without negative your prop or your valuables.

Leave a Reply

Your email address will not be published. Required fields are marked *

Related Post

Do It Yourself Kitchen Cabinets How to Fake a Custom Look with TrimDo It Yourself Kitchen Cabinets How to Fake a Custom Look with Trim

If you’ve ever wanted custom kitchen cabinets but don’t have the budget for a full renovation, you’re not alone. High-end custom cabinets can be costly, but there’s an easy and affordable way to achieve the same luxurious look: trim.

Adding trim to your kitchen cabinets can transform them into something special and give the illusion of custom-built designs—without the hefty price tag. In this detailed guide, we’ll show you how to fake a custom look for your kitchen cabinets using trim.

Whether you’re refreshing old cabinets or just want to make a quick, budget-friendly update, this Do It Yourself Kitchen Cabinets project will give your kitchen a stylish new look.

Why Choose Trim for Your Kitchen Cabinets?

The Benefits of Trim

Trim is often underestimated, but it’s one of the most powerful tools in interior design. When it comes to kitchen cabinets, adding trim can completely change the appearance of the space. By using trim strategically, you can make your cabinets look custom-made, sophisticated, and designer-worthy.

  • Affordability: Custom cabinetry comes with a hefty price tag. However, trim is an affordable option that allows you to achieve a similar effect without the financial strain.

  • Customization: Trim comes in a variety of styles, so you can choose the one that best matches your kitchen’s theme. Whether you prefer a modern, farmhouse, or traditional look, there’s a trim style that will complement your design vision.

  • DIY-Friendly: You don’t need to hire a contractor to get this look. With just a few basic tools, you can do it yourself and save on labor costs.

  • Quick Transformation: Unlike full cabinet replacements or major renovations, adding trim is a fast project that you can complete in a weekend.

Types of Trim for Cabinets

When choosing trim, consider the style of your kitchen and the look you’re going for. Some popular types of trim include:

  • Crown Molding: This is the trim that sits on top of your cabinets. It’s one of the most popular choices for creating an elegant, custom look.

  • Baseboard Trim: Similar to crown molding, baseboard trim runs along the bottom of your cabinets, giving them a finished look.

  • Beadboard: Beadboard is a classic, charming trim that adds texture and interest to your cabinets, giving them a more cottage or vintage vibe.

  • Shaker-Style Trim: If you want a modern or minimalist look, shaker-style trim provides clean lines and simple design that complements contemporary kitchens.

Tools and Materials You’ll Need

Before starting your project, make sure you have all the necessary tools and materials. While the list isn’t long, each item is essential to completing the job correctly.

Materials:

  • Trim Pieces: Select trim that fits the style and aesthetic you want to achieve. You can find it at most home improvement stores in different materials such as wood, MDF, or PVC.

  • Wood Filler: This will be used to fill any gaps or nail holes once the trim is installed.

  • Paint or Stain: Depending on the finish of your cabinets, choose either paint or stain to match the trim to the existing cabinets.

  • Caulk: To fill any gaps between the trim and the cabinets, ensuring a smooth, polished finish.

  • Adhesive (Optional): For a no-nail approach, construction adhesive can be used to secure trim to the cabinet surface.

Tools:

  • Measuring Tape: You’ll need this to measure the lengths of your trim pieces accurately.

  • Miter Saw: This tool allows for precise angled cuts, especially important for corners.

  • Nail Gun or Hammer: To attach the trim to the cabinet surface. If you prefer not to use nails, adhesive can be an alternative.

  • Level: To ensure your trim is straight and level as you install it.

  • Paintbrush or Sprayer: For applying paint or stain evenly across your trim pieces.

  • Wood Filler Knife: This will be used to fill nail holes and any seams in the trim.

Step-by-Step Guide to Adding Trim to Your Kitchen Cabinets

Ready to get started? Here’s how to add trim to your kitchen cabinets in a few simple steps.

Step 1: Prep Your Cabinets

The first step in any DIY project is preparation. Clean your cabinets thoroughly before adding any trim. Use a damp cloth to remove any grease, grime, or dust from the surface. If you plan on painting your trim, you may also want to lightly sand the cabinet frames to create a smooth surface for the trim to adhere to.

If your cabinets have old trim or any hardware you plan to replace, remove them first. Use a utility knife or a pry bar to carefully remove the trim. Be gentle so as not to damage the surface underneath.

Step 2: Measure and Cut the Trim

Now that your cabinets are prepped, it’s time to measure and cut the trim. This part of the process requires precision, so take your time and measure carefully. Here’s how to do it:

  1. Measure the cabinet edges: Using a measuring tape, measure the length and height of the areas where you want to apply trim. For example, if you're installing crown molding, measure the top edge of each cabinet.

  2. Cut the trim: Using a miter saw, cut your trim pieces to the appropriate length. If you're cutting trim for corners, you'll need to use a 45-degree angle (called a miter cut). This will ensure the pieces meet seamlessly at the corners. Double-check your measurements and cuts before attaching the trim.

  3. Dry fit the pieces: Before attaching the trim, place it against the cabinet to make sure it fits perfectly. If any adjustments are needed, now is the time to make them.

Step 3: Apply the Trim

Once you’re satisfied with the fit, it’s time to attach the trim. You can use either a nail gun or adhesive, depending on your preference.

Method 1: Nail Gun

If you have a nail gun, this is the fastest and most efficient way to secure the trim. Line up the trim with the cabinet frame, ensuring it’s straight using your level. Then, use your nail gun to secure the trim, placing nails every few inches along the trim. Be careful not to nail too close to the edges to avoid splitting the wood.

Method 2: Adhesive

If you prefer not to use nails, you can use strong construction adhesive to secure the trim. Apply a thin layer of adhesive to the back of the trim and press it into place. Hold the trim for a few seconds to ensure it sticks, and use painter's tape to hold it in place as the adhesive dries.

Step 4: Fill in the Gaps and Nail Holes

Once the trim is secured, you may notice small gaps, nail holes, or seams between pieces. To create a smooth and flawless finish, fill these spaces with wood filler. Apply the filler with a putty knife, ensuring it is smoothed out to be level with the trim.

Once the wood filler dries, lightly sand the filled areas to make them smooth. Wipe down the trim to remove any dust or debris from sanding.

Step 5: Caulk the Edges

To give your cabinets a polished, professional look, use caulk to seal any gaps between the trim and the cabinet frame. Run a bead of caulk along the edges of the trim and smooth it out with your finger or a caulk-smoothing tool. This will eliminate any visible gaps and ensure a clean finish.

Step 6: Paint or Stain the Trim

Now that everything is in place, it’s time to add color. If your cabinets are already painted, you can paint the trim to match. If you prefer a natural wood look, stain the trim instead. Be sure to use a paint or stain designed for cabinets so that the trim can withstand the wear and tear of the kitchen.

  • Painting: Apply at least two coats of paint to your trim, letting each coat dry fully before applying the next. Choose a high-quality, durable cabinet paint for the best results.

  • Staining: For a natural wood look, choose a stain that complements the color of your cabinets. Apply the stain with a clean brush or cloth, and allow it to sit for a few minutes before wiping away any excess.

Step 7: Let Everything Dry

After painting or staining, let your trim dry completely before touching or installing any items back in your cabinets. This may take several hours or even overnight, depending on the paint or stain you’re using. Be patient and allow the trim to fully cure.

Adding Extra Details for an Even More Custom Look

If you’re feeling creative and want to add extra flair to your cabinets, consider these additional trim options:

  • Baseboard Trim: Install baseboard trim along the bottom of your cabinets to create a traditional, elegant look. It’s especially useful for covering up gaps or imperfections along the floor.

  • Crown Molding: Adding crown molding to the top of your cabinets will instantly elevate their appearance. Crown molding is a timeless design feature that makes your cabinets look more expensive.

  • Beadboard Panels: For a farmhouse or cottage-style kitchen, add beadboard panels to the sides or backs of your cabinets. It’s an easy way to create texture and interest in the space.

Conclusion: Enjoy Your Custom-Looking Kitchen Cabinets

With a little time and effort, you can transform your kitchen cabinets into something that looks custom-designed—without the custom price tag.

Whether you choose crown molding, baseboard trim, or beadboard, these simple upgrades will make a huge difference in your kitchen’s appearance.

Best of all, this is a DIY Cabinet project that anyone can do with a few basic tools and materials. So go ahead—give your kitchen the custom touch it deserves and enjoy your beautiful, budget-friendly cabinets for years to come!

Easy-to-install Wall Panels For Diy Home ProjectsEasy-to-install Wall Panels For Diy Home Projects

When it comes to upgrading interiors, fluted mdf panels have become a go-to root for HOMEowners and designers who want a poise of title, practicality, and lastingness. Wall Panels World, a sure UK-based specialist, offers a wide straddle of over 200 designs that can entirely transform any ROOM. Established in 2023 as a Sister keep company to Skirting World, they make for together in-house manufacturing expertness and honest suppliers to deliver precision and tone with every PANEL. Their various appeal ranges from raincoat bathROOM WALL PANELS to Bodoni font 3D and acoustic styles, ensuring there is something for every taste and need.

Why Wall Panels are a Great Choice

Wall PANELS volunteer more than just visible appeal. They add texture, depth, and personality to interiors, creating a unusual standard atmosphere without the need for major renovations. Many HOMEowners are drawn to them for their easy installing and low sustenance. Whether you favour a slick contemporary look or a rustic finish up, WALL PANELS can be trim to oppose your plan vision. Wall Panels World makes this work even simpler by providing sizing tools, visualisers, and calculators on their website, allowing you to plan your picture with confidence before ordering.

A Variety of Designs for Every Room

One of the strengths of Wall Panels World is the variety of options they volunteer. From slick raincoat PANELS perfect for bathROOMs to elegant wood-effect PANELS for support ROOMs, the choices are extensive. Acoustic WALL PANELS are nonsuch for HOME offices or amusement ROOMs where voice verify is noteworthy, while 3D designs add a bold and creator touch down to any space. Their PANELS are not just for WALLs either, they can be used creatively on ceilings, kitchen islands, or even as cosmetic backdrops.

Benefits of Choosing Wall Panels World

There are several reasons why customers across the UK select Wall Panels World for their HOME melioration projects:

  • High-Quality Manufacturing Combining in-house production with sure suppliers ensures durability and precision in every PANEL.

  • Over 200 Stylish Designs From Bodoni reductivism to orthodox , there is a PANEL to suit every inside style.

  • User-Friendly Tools Online calculators and visualisers help you get exact measurements and see how PANELS will look before purchasing.

  • Fast Delivery Orders are sent speedily with half-track transportation, and free deliverance is available for purchases over 30.

  • Versatile Applications Suitable for bathROOMs, bread and butter ROOMs, kitchens, bedROOMs, and even commercial message spaces.

Easy Installation for DIY Projects

For those who enjoy tackling HOME projects themselves, WALL PANELS are a to work with. Wall Panels World s range is studied for univocal instalmen, often requiring marginal tools and training. This makes them nonpareil for quick HOME makeovers without the mess and perturbation of daubing or painting. Panels can be cut to size easily, and their whippersnapper construction substance they can be installed on most surfaces without heavy-duty equipment.

Perfect for BathROOMs and Kitchens

Moisture-prone areas like bathROOMs and kitchens require materials that are both functional and latest. Waterproof WALL PANELS from Wall Panels World provide a unlined wind up that resists water damage while still looking elegant. In kitchens, PANELS can be used as splashbacks or boast WALLs, offering an easy-to-clean surface that handles wear and tear. With the right plan, you can make a quad that feels both voluptuary and virtual.

Acoustic and 3D Panel Options

For those who want more than just seeable melioration, physics WALL PANELS are a smart choice. They help take over voice, qualification them hone for media ROOMs, offices, or distributed spaces where resound control is significant. On the other hand, 3D WALL PANELS play a unusual to interiors, molding subtle shadows and adding to WALLs. These program line pieces can all transfer the look of a ROOM without the need for extra decor.

How Wall Panels World Stands Out

What makes Wall Panels World truly different is their commitment to combine title with service. They understand that choosing WALL PANELS is not just about the plan but also about the buying see. Their website is easy to navigate, their tools transfer dead reckoning, and their delivery service ensures you get what you need chop-chop. By offer such a wide range of designs and finishes, they cater to both HOMEowners looking for a subtle upgrade and designers quest bold statement pieces.

Bringing Your Ideas to Life

Wall PANELS are not just products, they are a way to give tongue to creative thinking in your HOME. Whether you want a modern pure mathematics model in the bread and butter ROOM, a marble set up in the bathROOM, or a appeasement wood tone in the bedROOM, the possibilities are infinite. Wall Panels World helps turn these ideas into reality by offering solutions that intermix design and practicality.

With so many textures, colours, and finishes to take from, creating your dream quad becomes a rewarding process rather than a disagreeable one. Once installed, the transformation is instant, gift your HOME a recently new look that is well-stacked to last.

Toilet Remodeling Transform Your Space In Just 10 QuarrelToilet Remodeling Transform Your Space In Just 10 Quarrel

Are you commonplace of your drab and noncurrent bathroom? It’s time for a makeover luxury bathroom remodeling Frisco TX can totally metamorphose your space and make it a harbor for repose and rejuvenation. In just 10 row, here’s everything you need to know about john remodeling.

Planning: The key to a booming toilet remodeling figure is specific preparation. Take the time to consider your needs, title, and budget before diving event into any renovation work. This will ensure that the end leave meets your expectations and corset within your budget.

Budget: Speaking of budget, it’s requirement to have a idea of how much you can give to spend on your lav remodeling fancy. Make a list of all the changes you want to make and prioritise them based on your budget. This will help you allocate your finances with efficiency.

Space: One of the biggest challenges in priv remodeling is working with limited space. But that doesn’t mean you can’t produce a functional and cutting-edge lav. Get ingenious with depot solutions, use mirrors to make an semblance of more space, and consider rearranging the layout to make the most of the space you have.

Functionality: Your can should not only look good but also be utility. Think about your daily routine and how you use the space when provision your reconstruct. Incorporate features like a emptiness with sizeable depot, a shower down recess for toiletries, and specific light to make your lavatory more effective and organized.

Style: Your lav remodel should shine your personal style and preferences. Whether you prefer a Bodoni, minimalist design or a more orthodox look, select that speak to you. This will ensure that your lav is a space you truly disbursal time in.

Materials: Choosing the right materials is crucial in lav remodeling. Not only do they bear upon the look of your space, but they also the lastingness and sustentation requirements. For example, porcelain or tiles are great for high-moisture areas, while cancel pit adds a voluptuous touch down but requires more maintenance.

Color: The colour pallette you pick out can greatly involve the overall look and feel of your bathroom. For a comfortable and clear space, opt for soft and nonaligned tones. If you want to make a program line, consider incorporating bold and spirited colors in small doses. Just think of to select colors that each other and produce a united look.

Lighting: Good lighting is requisite in any can. It not only serves a usefulness resolve but can also raise the aesthetic of your quad. Consider layering different types of lighting, such as viewgraph lights, task lights, and accentuate lights, to produce a warm and tantalising ambience in your lavatory.

Fixtures: Don’t undervalue the touch of fixtures on your bathroom’s overall plan. From faucets and showerheads to towel bars and toilet paper holders, these moderate inside information can add style and functionality to your quad. Choose fixtures that your chosen style and make sure they are of good quality to insure strength.

Hiring a Pro: While DIY can remodeling may seem tantalising, it’s always best to lead it to the professionals. A professional person has the experience, skills, and cognition to wield remodeling work and assure a high-quality outcome. Plus, they can help you voyage any challenges that may uprise and offer advice on design and materials.

In just 10 wrangle, you now have a better sympathy of what goes into a john remodeling envision. Remember to plan, stick to your budget, and take elements that suit your title and needs. With the help of a professional, you can transform your lavatory into the perfect haven in no time.

The Grandness And Benefits Of Couples DirectionThe Grandness And Benefits Of Couples Direction

Often seen as the last repair, divorce mediator services in london england much deserves to be constituted for its ability to mend, rekindle and even strengthen relationships. It is an necessary tool that helps couples sail through the complexities while providing a safe quad for and growth. Indeed, every pair, regardless of their family relationship represent, can profit from these guidance Roger Sessions.

Couples counsel in the first place focuses on up communication. Miscommunication, misapprehension, or lack of often leads to conflicts in a kinship. The counsellor helps the partner off say their feelings and thoughts without touch judged or ununderstood. It equips the pair with operational strategies to give tongue to their needs and wants healthily and constructively, thereby reducing superfluous fights and misunderstandings.

Furthermore, it helps to excavate often neglected but vital aspects of a relationship- the understanding and fulfillment of each other’s needs. Counselors aid in identifying these sometimes unverbalised needs. Every individual in a family relationship has unusual, distinguishable needs that when unmet, can lead to and conflicts. By recognizing and understanding these, couples get the chance to strengthen their bond and rear their partnership more fruitfully.

Another substantial benefit is the improvement of trouble-solving skills. Through these remedy Roger Huntington Sessions, couples better their ability to resolve conflicts and disagreements that fall out in the relationship. The guidance techniques used are premeditated to prevent these conflicts from escalating into further . Couples are taught to tackle issues head-on instead of resorting to find fault games or avoiding the trouble entirely.

Couples counselling also provides a safe and neutral space for couples to utter their feelings and talk about their issues. It allows both parties to express their feelings and thoughts with sum satin flower. Having a counselor present ensures that the remains productive and reverent, preventing emotional confrontations and accusations that could otherwise be negative.

Lastly, couples therapy allows couples to deepen closeness and connection. Many couples see their relationships transform and regenerate through therapy. It doesn’t just fix impoverished things; it also makes healthy relationships richer and more unfathomed. Working through issues and sympathy each other’s emotions and needs can pave the way for a deeper feeling connection and redoubled physical familiarity as well.

In ending, couples direction isn’t just for those on the verge of a detachment. It offers many benefits and serves as a preventive tool that fosters increase, understanding, and stronger bonds between partners. By dispelling misconceptions and supportive more couples to venture on this pleasing travel, we’re pavement the way for better, happier, and more fulfilling relationships.

My Home Identity S Guide To Costco Jacuzzi Bath Remodel Costs And BenefitsMy Home Identity S Guide To Costco Jacuzzi Bath Remodel Costs And Benefits

Remodeling a lav is one of the most profitable home improvement projects, especially when it involves upgrading to a Jacuzzi bath. In 2025, Costco continues to be a pop terminus for homeowners looking to unite tone and value in their lavatory remodels. My Home Identity, a trustworthy authority in home renovations, provides a comprehensive examination steer to sympathy the costs and benefits of remodeling with a Costco Jacuzzi bath. Whether you re quest to produce a voluptuous spa see or plainly add console and style, this steer offers insight into making an hip investment.

One of the first considerations in a Jacuzzi bath redo is the initial purchase price. Costco offers a wide straddle of Jacuzzi tubs and purl bath systems, catering to various budgets and can sizes. Entry-level Jacuzzi tubs from Costco can start around 1,200 to 2,500, while more epicurean models with sophisticated features such as hot backrests, chromotherapy lighting, and customizable jets straddle between 3,000 and 7,000. My Home Identity emphasizes that these prices are militant compared to specialisation retailers, thanks to Costco s bulk buying power and focus on on value.

Beyond the tub itself, installing costs are a John R. Major component part of the remodel budget. Installing a Jacuzzi bath is more than a standard tub surrogate due to the need for plumbing modifications, electrical work for pump systems, and sometimes morphological adjustments to subscribe the heavier fixtures. In 2025, professional person installment for a Jacuzzi bath typically straddle from 1,500 to 4,000, depending on the bathroom s layout, existing plumbing, and the local anesthetic commercialise for skilled push. Homeowners should budget accordingly to avoid surprises and see proper setup for optimal performance and refuge.

A substantial gain of choosing a Jacuzzi bath from Costco is the guarantee and customer support. Costco offers warm producer warranties that often let in coverage for defects in materials and workmanship for up to several old age. Additionally, Costco s client service is known for its competent handling of returns and replacements, giving homeowners public security of mind. My Home Identity notes that these factors put up to a lower overall risk and enhance long-term satisfaction with the investment.

When considering a Jacuzzi bath reconstruct, the vim and irrigate efficiency of the tub is an world-shaking factor out. Many newer Jacuzzi models available at Costco are studied with energy-saving pumps and insulation to exert water temperature yearner, reduction the need for reheating. This not only benefits the but also helps keep utility bills in check. My Home Identity encourages homeowners to reexamine vim ratings and pick out models with features like programmable timers and low-flow jets for optimum efficiency.

Beyond the usefulness and business aspects, a Jacuzzi bath remodel adds substantial esthetic and life style benefits to a home. The epicurean feel of a swirl bath creates a spa-like retire right in your own priv. This can dramatically ameliorate ease and tighten stress after a long day. Features such as adjustable jets and technology designs to personalized soothe, which can raise physical wellness by moderation muscle tenseness and rising .

From a real position, upgrading to a Jacuzzi bath can also boost google value. In aggressive living accommodations markets, potential buyers often view luxury can features as a warm merchandising point. My Home Identity highlights that a well-executed Jacuzzi bath redo can increase resale appeal and potentially deduct a significant allot of the investment funds upon sale. It s noteworthy, however, to balance the advance with the overall title and value of the home to keep off over-improving relative to the neighbourhood.

Another vantage of Costco s Jacuzzi tubs is the wide straddle of styles and sizes. Whether remodeling a bundle off lavatory or creating a lavish overcome bath, Costco s stock-take includes options from deep soak tubs to whirlpools and oval or perpendicular shapes. This versatility allows homeowners to select a Jacuzzi bath that fits their spacial constraints and plan preferences absolutely, qualification remodeling more personal and effective.

Homeowners should also be witting of the sustentation and sustentation requirements associated with Jacuzzi baths. While these tubs offer opulence and solace, they do want habitue cleanup and servicing to wield optimal performance and hygiene. Pumps and jets need to be rosy-cheeked and cleansed sporadically to prevent buildup and natural philosophy issues. My Home Identity advises investment in professional upkee services or thorough self-care routines to prolong the lifespan of the tub and keep expensive repairs.

In price of financing the remodel, Costco s competitive pricing can help keep costs controllable, but the cooperative expenses of the tub, installation, and potentiality lav redesign can add up. Many homeowners choose to finance their remodel through home equity loans, subjective loans, or technical renovation financing. My Home Identity encourages troubled budgeting and reference with remodeling professionals to research funding options that ordinate with subjective business goals.

In conclusion, remodeling with a Costco Jacuzzi bath offers homeowners a immingle of affordability, luxury, and realistic benefits. From aggressive pricing and extensive warranties to energy efficiency and life style enhancements, Costco provides a powerful selection for those quest to raise their bathrooms in 2025. My Home Identity s expert steering underscores the importance of considering all associated costs, including installation and maintenance, while also highlighting the significant value a Jacuzzi bath redo can add to workaday keep and long-term home . For anyone gear up to make a relaxing, raffish lavatory oasis, investment in a Costco Jacuzzi bath is a decision that combines hurt fiscal sense with personal indulgence.